Sunday, December 17, 2017

Drill Rod Cutting Fixture

In making hundreds of my custom curved awls I have continued with the policy of upgrading the tooling every time I make a batch or two.

The 1st and one of the simplest operations is to cut the 4 different diameter drill rods to the proper lengths.

They are:
  • 5/64 @ 2.75"
  • 3/32 @ 3.00"
  • 7/64 @ 3.38"
  • 1/8 @ 3.75"

When there was only on size this was easy but as the range of offerings increased it became apparent that a fixture would make sense.

Initially I set up the bolt cutter like this to make it a one handed operation.
I would use a clamp and a right angle bracket to bump the rod up against and cut.
I realized that I need to design something that would jump from one length to another quickly and accurately, but couldn't see the answer clearly.
The 1st step to finding the answer is to layout the existing components. 
After that the design fell into place.
Each block of alum. swings out of the way for the next length block.


I think it takes about 30sec. to cut up a 3 foot drill rod into the correct lengths.


Monday, November 20, 2017

Landis 5 in 1 DIY Blade Sharpening

Several years ago I made a Dremmel grinder attachment for my lathe to sharpen small tools.
This week I brought out my Landis trimmer and one of the reasons I put it away was because it didn't cut cleanly.


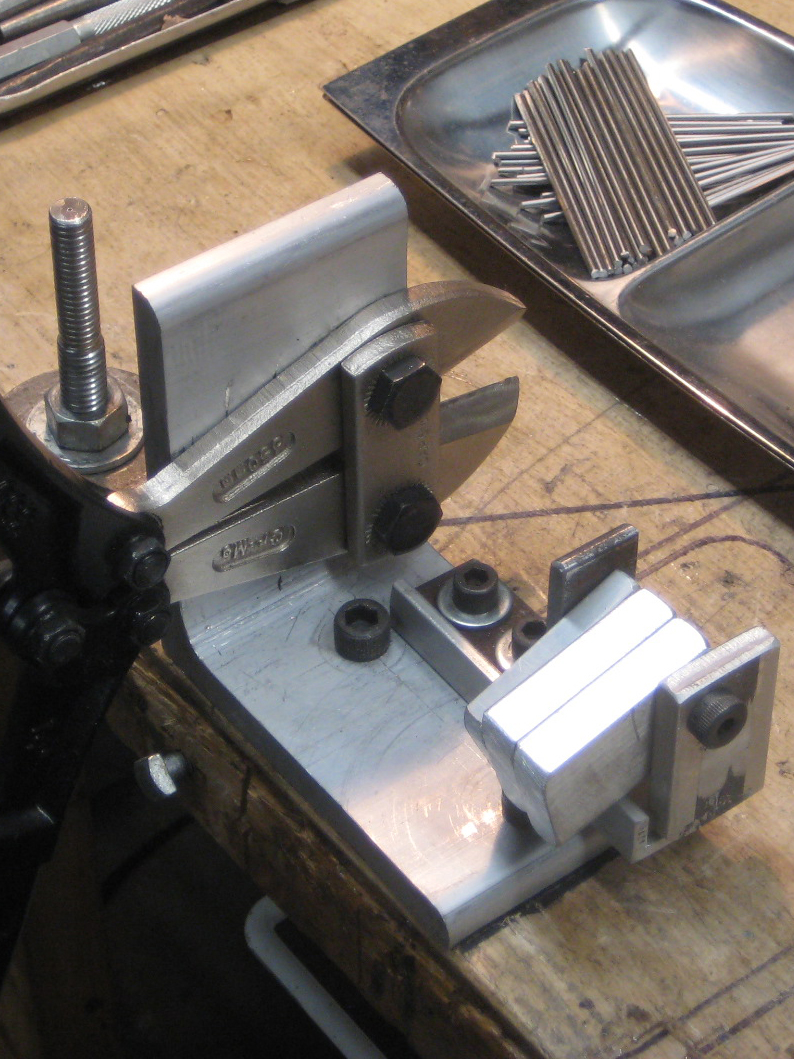
I made the Herculean effort to get the blade off of the shaft so I could sharpen it using my DIY Sherline sharpening system.

Removing these blades must be done carefully, the Left Hand thread is always confusing, they are hard to hold, and easily damaged.

I set an angle that would work for both the front and back side of the blade.
This set up required a custom holder for the blade, not too hard to make.
There seem to be two thread sizes for 5 in 1; 7/16-20, and 1/2-20, both Left Hand and both pretty rare.
Not having either of these what I do is make a holder out of a piece of steel Hex.
I turn down one end to a diameter that just interferes with the threads.
The 1/4-20 screw holds the blade hard onto the holder.


Grinding is about taking 0.001" inch at a time VERY slowly,  let the wheel cut for 30 seconds or more as you move towards the finished edge.

The cutting difference is great! If you find that your 5 in 1 is not cutting all the way thru it is getting dull.

Sunday, November 19, 2017

American Skiver - Model B

Could not resist this "Skiver Only" machine on CL
Did a complete tear-down and rebuild unfortunately I don't do repainting in the winter so that will have to wait.

It spun OK but slowly, I like to take every part off of the main casting.
With these old machines I like to update the screws when they have been abused and make subtle changes for the better, here I added a thumb screw for the lower blade adjustment 

Sharpened the blade on the WorkSharp

This one is in good shape none of the shafts are loose, no cracks in the casting, and the gear teeth are in good condition.
The patent number is maybe just a date so I haven't found the original drawing.
The weird "monkey motion" blade positioning system and all the parts are straight from the 5 in 1


Wednesday, October 11, 2017

Shereline Lathe - Large Diameter - Offset Bit holder

To machine these over size wood discs WITHOUT setting up the riser blocks I went ahead and made a quickie bit holder.

Obviously not stiff enough for metals but for this Bass wood it is very functional.

I used a piece of scrap that had been waiting around for years until the correct part came out of it.

Now I can get well over 3 inch dia without doing anything other than bolt on the new bit holder
Would have been better to reach over to include the far hold down on the cross-slide but the scrap piece ran out.


Sunday, October 8, 2017

DIY Acrylic (see thru) Metric Scale

This Acrylic Metric Scale was made back in 1984 when I was full time (56hrs) at Mercury Metal-craft in Warren Mi.

The Kozlowski's owned and operated this shop and it was fundamental to forming my life and skills sets that I now appreciate and rely on daily.

The shop was divided into two half's; the sheet-metal model making side and the metal removal side.

Hired by my High school friend James Kozlowski I was primarily working in the inspection room. The inspection room was a small but well maintained part of the complete puzzle that made up all of the services offered.

My main mentor in the inspection room was a fellow by the name of Robert Demchak Great guy; funny, talented, (Barber Shop Tenor) he too was instrumental in my understanding of Tolerancing and its effects on costs. 

Often on the sheet-metal side we in the inspections room had to verify both the wood pattern and the parts made and checked on it. Often to check the pattern we would have to take measurements from the "brownline" provided by the customer usually Ford, American Motors, and GM. I was told that Chrysler was avoided because "they didn't pay there bills" some things never change.

The see thru scale was something we made for ourselves in the inspection department and I especially like the one that I came up with.

A 3/4" piece of acrylic machined, hand scribed, and professionally lettered, I still use it (maybe once a year) to this day. 


Thursday, May 4, 2017

STANLEY No. 2 Plane Restored

This little gem came from an abused home, bought it for a $1.50 but had to invest in an ebay handle for $17 to make it complete
Never heard nor seen one my discerning eye knew there was something different and snagged it at an estate sale.
It had has lots of issues the worst being a cracked sidewall but it is still completely functional.
I think the beauty of the No2 is the front handle; many planes at this size are one handed tools and so don't have the control.

It has some of the craziest screw sizes; it uses several 12-20 screws

It rounds out the set of large vintage planes in my cabinet.


Tuesday, January 17, 2017

Sherline Lathe 1/4 inch Carbide Insert bit Alternative

Those little triangle carbide inserts are OK although there are some "not worth buying" ones out there so be careful ordering the cheapest.


I was trying to get to a carbide bit for my wood turning project when I came across these diamond shaped inserts and went ahead and made a holder to use with the standard tool post


One is 3/8 square and the other is 1/4 x 1/2

good so far

I think the goal is to use more conventional bits that are easier to find locally

Saturday, January 7, 2017

FoodSaver Adheasive & Epoxi Storage

Yes I have become a storage freak

I found the FoodSaver vacuum pump and decided that its real value was in the shop not the kitchen!

Very simply, the bags are good for a few uses, sometimes only one

I have never determined the exact cause of the reuse failures but I suspect it is dirt in the seal?

The boxes are beautiful and completely reusable.

I feel that after opening these expensive materials it is worth the effort and piece of mind to vacuum seal them