This a completely un-sponsored un-solicited opinion.
Possibly the most significant addition to my CNC work station is the ShuttleXpress. Marketed under several different names and widely varying prices this little guy is awesome.
Set up is quick and easy I won't go thru that.
I like to place it anywhere on my desk that is most comfortable that day or time. I set the X, Y, & Z across the top three buttons. The rubbery wheel is set with the negative spindle direction (counter-clockwise) and positive direction (clockwise.) I no longer use the inner most dial with the finger dent in it, maybe I'll revisit it sometime to see if I like it better.
I can't express how much easier and more friendly using my CNC mill has become now that I am an "expert" at using the ShuttleXpress for set up. when its time to set 0,0,0 you click whatever axis you need to start with (and get a little audio note from the computer,) then drive slow, then fast, then slow to your position. With Mach3 I hit the "Off Line" button on the screen, drive the numbers with the ShuttleXpress to the desired actual position, hit "Off Line" again and you are ready to start the NC program.
All of this can be done with the "Tab" initiated window on Mach3 but running that window from your mouse is terribly cumbersome, I don't even open that window anymore.
I love ALL Crafts and have a fantastic shop where I mostly make tools for shoe Making and Shoes Trained as a Draftsman over 40 years ago I spent most of that time in Advanced Vehicle Engineering. With a BFA in Crafts from CCS I have been making art in my studio all that time too. I currently teach Leather working & Shoe Making at CCS in Detroit
Monday, July 29, 2013
Thursday, July 18, 2013
Sherline Lathe - Allignment
Alignment is critical so I wanted a way to mechanically align the head and the tail stock.
I purchased a 1/4" tail stock extension from LatheCity and fit a .251 gage pin in the end. With both the tail stock and the spindle head slightly loose and the gage pin secured into a .250 collet I then slowly tightened each until secure.
The test to see if all was good was to move the extension all the way off of the gage pin and back onto it noticing for any hang up when encountering the gage pin again.
So for the indicator readings prove-out I put the old Last-Word on it.
With the .251 pin in the collet I got a reading at the spindle end of 3 tenths TIR. And driving the full length of the pin I found no readable deviation; as my friend Tom Vickers always says: "good enough for who its for."
Friday, June 14, 2013
Landis Strap Cutter - Restoration / Sharpening
Bought the strap cutter and with shipping the price was fair but it really needed a new blade.
The blade had a chip knocked out of it, too deep to sharpen out, and too deep to live with. After pricing out the new blade at over $100 I decided I should at least try to fix it, since I would have nothing to loose.
I decided that the TIG welder was going to be the answer... TIG is amazing, much more like gas welding than MIG.
So I added some metal to the edge of the blade.
And ground it off very slowly keeping it cool.
Made the Herculean effort to get the blade off of the shaft so I could sharpen it using my DIY Dremel grinder attachment sharpening system.
Removing these blades must be done carefully, the Left Hand thread is always confusing, they are hard to hold, and easily damaged.
After sharpening I quickly tried it out and with softer leather the cut was not all the way through. I decided that it was because the gap between the drive teeth and the outer ring was too great, about 0.080" So I shimmed the drive teeth out about 0.015" and cut 0.025" from the inside of the ring making the gap less than half the width it was. The leather can't be pushed down into the gap like it used to.
And here she is all finished.
I repainted all of the black parts and the logo too, then not wishing to match the green and I like the mild "worn" look I simply sprayed the entire piece with clear lacquer, after a thorough washing with Super-Clean.
The blade had a chip knocked out of it, too deep to sharpen out, and too deep to live with. After pricing out the new blade at over $100 I decided I should at least try to fix it, since I would have nothing to loose.
I decided that the TIG welder was going to be the answer... TIG is amazing, much more like gas welding than MIG.
So I added some metal to the edge of the blade.
And ground it off very slowly keeping it cool.
Made the Herculean effort to get the blade off of the shaft so I could sharpen it using my DIY Dremel grinder attachment sharpening system.
Removing these blades must be done carefully, the Left Hand thread is always confusing, they are hard to hold, and easily damaged.
After sharpening I quickly tried it out and with softer leather the cut was not all the way through. I decided that it was because the gap between the drive teeth and the outer ring was too great, about 0.080" So I shimmed the drive teeth out about 0.015" and cut 0.025" from the inside of the ring making the gap less than half the width it was. The leather can't be pushed down into the gap like it used to.
And here she is all finished.
I repainted all of the black parts and the logo too, then not wishing to match the green and I like the mild "worn" look I simply sprayed the entire piece with clear lacquer, after a thorough washing with Super-Clean.
Wednesday, June 12, 2013
Delta BOSS Modification
I got the BOSS back when it 1st came out and I think it is a extremely well engineered machine. Plus unlike most other Delta machines it is QUIET; I love Quiet, all of the typical Delta machines like my 1" belt sander make as much noise as a garbage truck, I hate it, and won't consider Delta unless I hear it run 1st.
As I moved away from woodworking and into shoe making I used the BOSS very little but found that I needed a spindle sander for critical finish work on the leather soles and heels.
The problem is the oscillation; the spindle must be stationary. So I decided to figure out how to disable the oscillation motion.
After successfully removing the two links and locking the the motor in the up-most position I realized that I had a great opportunity to make an adjustable height system.
I am so far very happy with the results.
As I moved away from woodworking and into shoe making I used the BOSS very little but found that I needed a spindle sander for critical finish work on the leather soles and heels.
The problem is the oscillation; the spindle must be stationary. So I decided to figure out how to disable the oscillation motion.
After successfully removing the two links and locking the the motor in the up-most position I realized that I had a great opportunity to make an adjustable height system.
I am so far very happy with the results.
Monday, June 10, 2013
Shop charts - Drill size reverse look up chart
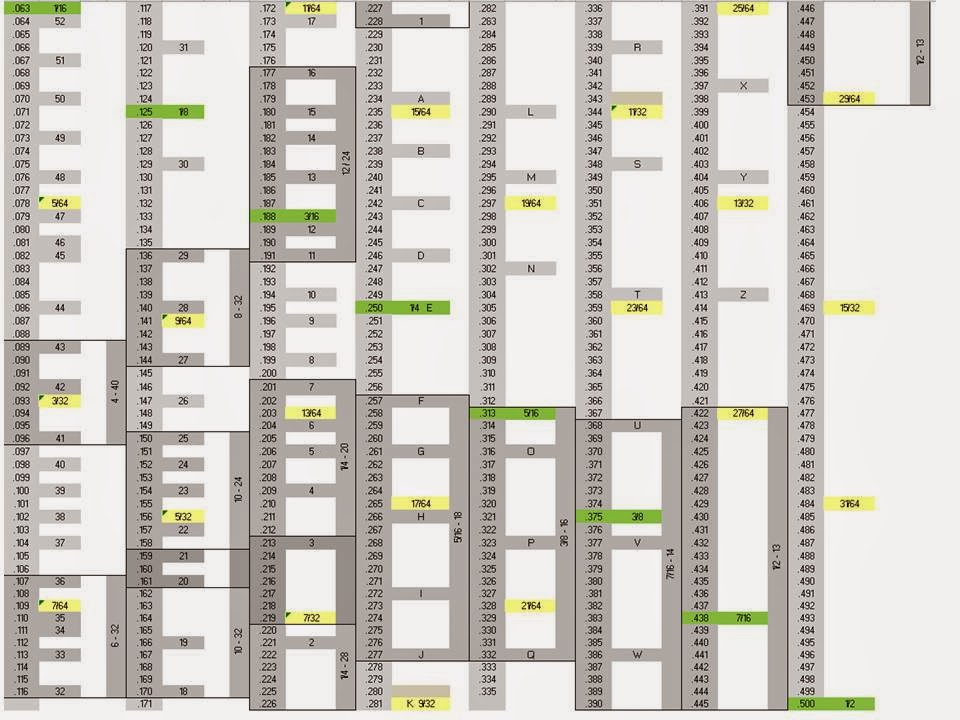
I just like this way better; instead of the standard drill size charts I spent all the time to make this far better method for finding drill sizes.
I have always disliked going through the process of "finding the closest" when using standard drill charts, this mostly occurs when I am doing restoration work.
There are two ways you look up drill sizes:
This chart allows you to find the exact number that you have on the micrometer in your hand and decide how to proceed with the standard sizes available.
The reason I like this method is because when you are standing there with the micrometer in your hand and you have decided on the number that you like, that number is not on the standard charts, only something close to it. With this chart you focus on the exact number on the micrometer, then start looking for standard sizes. It's an easier "reverse look-up" than doing the math in your head.
I added the common fastener sizes and again I think it is easier to see the whole range at a glance than any other way.
When you look at it the gaping holes jump out, it seems like almost any other system of standard sizing would have been better but this is what we have to work with.
Hope you find this useful.
07.30.13
After using my chart on several projects I am completly sold on it; it is so much better to have each number than it is to start with doing the math in your head every time you want to assess a dimension.
I have always disliked going through the process of "finding the closest" when using standard drill charts, this mostly occurs when I am doing restoration work.
There are two ways you look up drill sizes:
- Start with existing sizes and get the decimal equivalent.
- Measure something and find what is closest.
This chart allows you to find the exact number that you have on the micrometer in your hand and decide how to proceed with the standard sizes available.
The reason I like this method is because when you are standing there with the micrometer in your hand and you have decided on the number that you like, that number is not on the standard charts, only something close to it. With this chart you focus on the exact number on the micrometer, then start looking for standard sizes. It's an easier "reverse look-up" than doing the math in your head.
I added the common fastener sizes and again I think it is easier to see the whole range at a glance than any other way.
When you look at it the gaping holes jump out, it seems like almost any other system of standard sizing would have been better but this is what we have to work with.
Hope you find this useful.
07.30.13
After using my chart on several projects I am completly sold on it; it is so much better to have each number than it is to start with doing the math in your head every time you want to assess a dimension.
01.30.14
Added some overlap tap groupings.
Sunday, June 2, 2013
2 Sided tape Splitter for leather work
For leather work two sided tape can be a huge time saver. This model from 3M (#S-17454) is the best however... the minimum width is a 1/2". The tape film itself is only 0.002" thick; very nice.
So I made this 1/4" splitter. The Exacto blade is 0.020" thick so it is mounted .240" above the table. It must have the screw near the end to keep the blade from rising as you cut.
I used a 1/2" x 1.3" x 3.2" piece of black nylon to make this splitter. I made this little gem for my new friend Lisa Sorrell.
So I made this 1/4" splitter. The Exacto blade is 0.020" thick so it is mounted .240" above the table. It must have the screw near the end to keep the blade from rising as you cut.
I used a 1/2" x 1.3" x 3.2" piece of black nylon to make this splitter. I made this little gem for my new friend Lisa Sorrell.
Tuesday, April 23, 2013
Vintage Drill Bit Holders
I became fixated on this particular style of vintage drill bit holder and spent several months searching on EBay to finally acquire these two beauties.
I will need to do a restoration paint job on the fractional holder in the future.
Quite a mess so after water blasting I decided to etch the surface so that my paint job would not end up like the original. It seems like a zinc casting so it is nice and heavy but the original surface was so smooth that blue paint had nothing to bite into. I went with a tough gloss black enamel and the next day scraped off each of the fractions, very readable.
Without drills in it the holes appeared to be all parallel but to my surprise they are fanned out to make it easier to handle the drills. The designer went for 4 rows of 8 drills that left 3 extra... so there are four 1/16 bits; brilliant!
I have been designing my own Letter drill set holder but have not settled on a design yet. When I do I will mill it out of heavy tooling foam or aluminum. submit your ideas!
25
07.22.13
I picked up one of these diamond shaped Cleveland Drill holders for another numbered drill set and was so impressed with the usefulness of the design that I quickly went for the fractional size too.
A very nice design; the 64ths run up one side and all the other sizes on the right side, its easy to read and heavy enough to stay on the table. The numbered set goes from 1 to 60 with the odd numbers on the left and even numbers on the right.
Next came this totally unique folding case, normally I dislike folding cases because they are hard to use, hard to read, and hard to keep open. Now this General case solves all of the above issues and does it with beautiful design.
Although not small it is for good reason, it is wide and thin compared to the standard three row case.
When open we have only two rows with this clever folding size plate that has both the fractions and the decimals listed together, big enough and contrasting enough to read easily. In addition it has a Tap drill size chart on the inside of the cover.
It stays open via this cool little red kickstand on the right. All in all a great little design albeit big and heavy its a nice example of let's do it right!
09.21.13
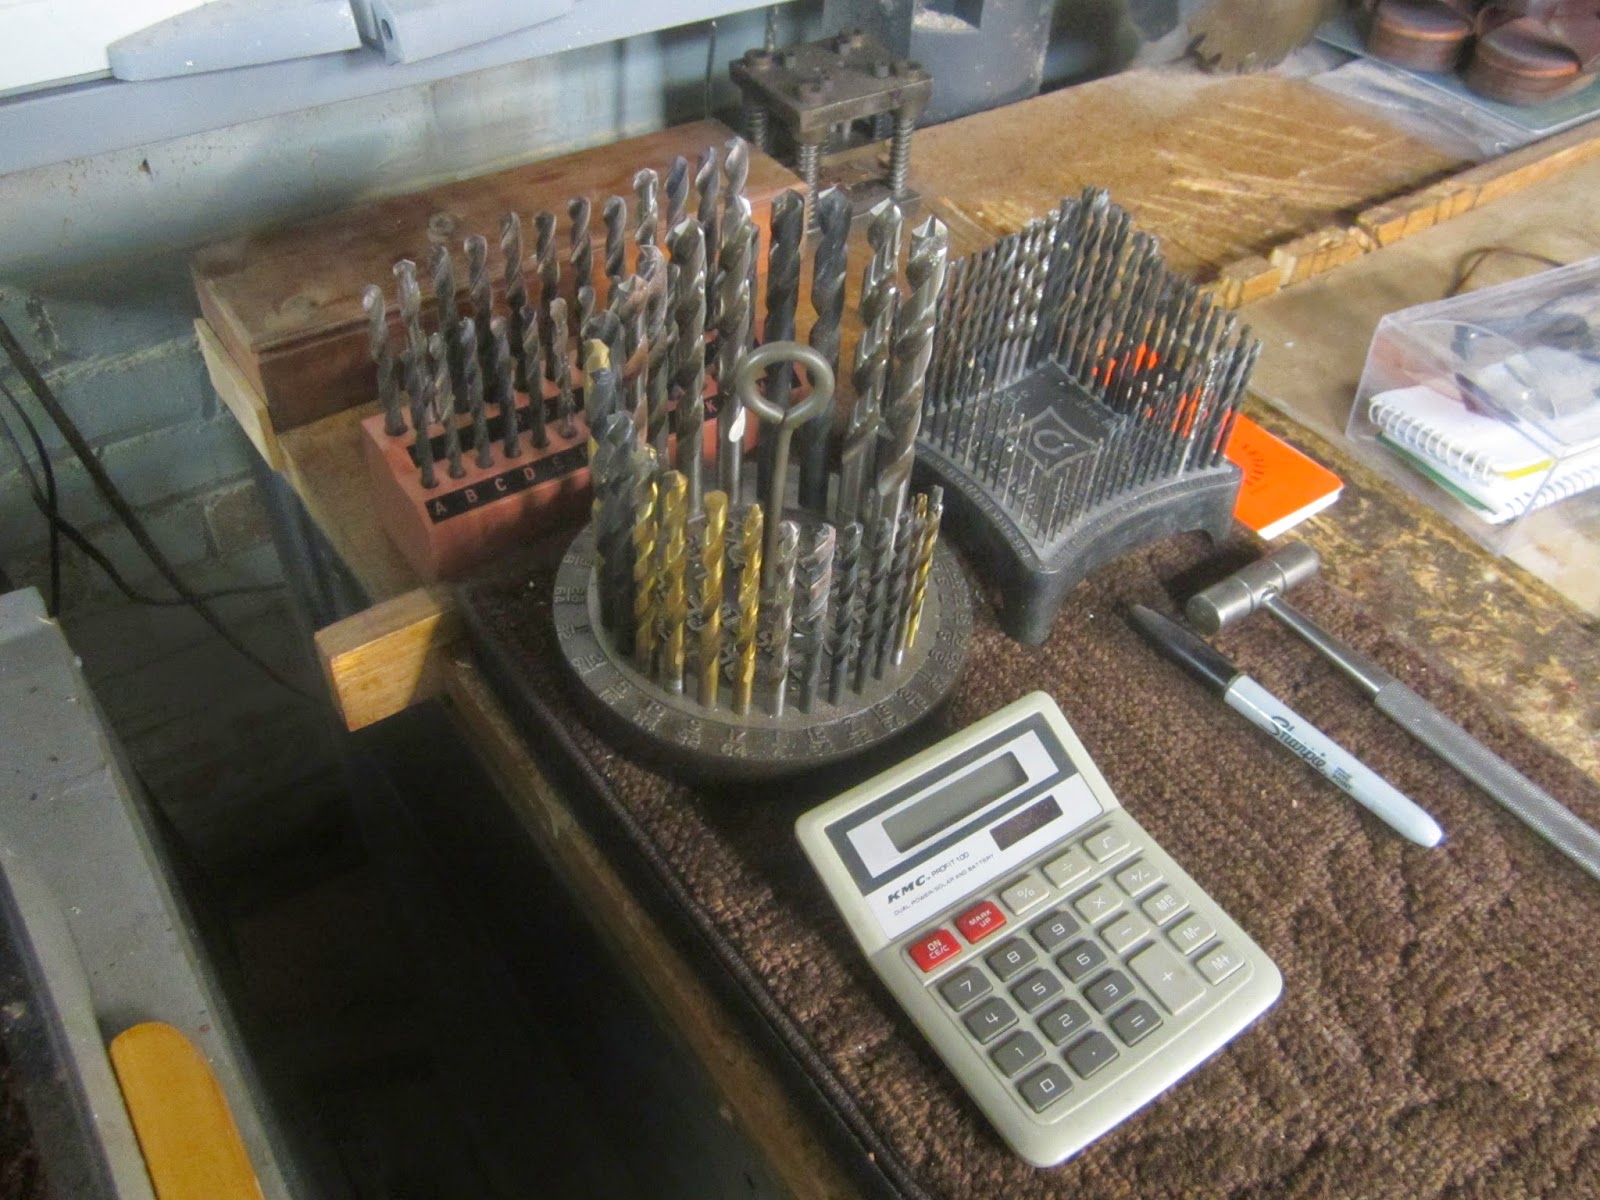
Now this is the BEST; big, heavy, and easy to read the New Process bit holder is beautiful and functional. Plus it's got the pick-up ring in the center for easy moving about.
I refinished it with a paste gun blue after media blasting, then sanded the highlights with 220 on the random orbital and lastly sprayed it with a clear lacquer.
I didn't notice until I went to take the picture that the NP and the Cleavland fit together perfectly about an inch apart!
04.26.14
Well apparently I am the only person that ever wanted a Letter drill holder and since I have never come across one I decided to make my own.
I tried many different designs but had to settle on a very simple shape because I was using my Casio label maker for the letters.
I machined the basic form out of 30 lb. foam. I added a small radius at the top of each opening and machined down into each hole about 0.150" this allowed me to drill each of the holes using the milled guide.
These Cleavland drill bit holders are very cool and when you are in the shop they are always a pleasure to turn to.
As soon as I got the fractional size I realized that there were also numbered drill bit holders out there too.
I will need to do a restoration paint job on the fractional holder in the future.
05.20.13
OK a little Drill bit holder obsession going on here but its fun, they are cool, and I use them.
Next I came across this little gem on EBay and had to have it!
I could see thru the original condition that it was unique and had potential.
Quite a mess so after water blasting I decided to etch the surface so that my paint job would not end up like the original. It seems like a zinc casting so it is nice and heavy but the original surface was so smooth that blue paint had nothing to bite into. I went with a tough gloss black enamel and the next day scraped off each of the fractions, very readable.
I have been designing my own Letter drill set holder but have not settled on a design yet. When I do I will mill it out of heavy tooling foam or aluminum. submit your ideas!
25
07.22.13
I picked up one of these diamond shaped Cleveland Drill holders for another numbered drill set and was so impressed with the usefulness of the design that I quickly went for the fractional size too.
A very nice design; the 64ths run up one side and all the other sizes on the right side, its easy to read and heavy enough to stay on the table. The numbered set goes from 1 to 60 with the odd numbers on the left and even numbers on the right.
Next came this totally unique folding case, normally I dislike folding cases because they are hard to use, hard to read, and hard to keep open. Now this General case solves all of the above issues and does it with beautiful design.
Although not small it is for good reason, it is wide and thin compared to the standard three row case.
When open we have only two rows with this clever folding size plate that has both the fractions and the decimals listed together, big enough and contrasting enough to read easily. In addition it has a Tap drill size chart on the inside of the cover.
It stays open via this cool little red kickstand on the right. All in all a great little design albeit big and heavy its a nice example of let's do it right!
09.21.13
Now this is the BEST; big, heavy, and easy to read the New Process bit holder is beautiful and functional. Plus it's got the pick-up ring in the center for easy moving about.
I refinished it with a paste gun blue after media blasting, then sanded the highlights with 220 on the random orbital and lastly sprayed it with a clear lacquer.
I didn't notice until I went to take the picture that the NP and the Cleavland fit together perfectly about an inch apart!
04.26.14
Well apparently I am the only person that ever wanted a Letter drill holder and since I have never come across one I decided to make my own.
I tried many different designs but had to settle on a very simple shape because I was using my Casio label maker for the letters.
I machined the basic form out of 30 lb. foam. I added a small radius at the top of each opening and machined down into each hole about 0.150" this allowed me to drill each of the holes using the milled guide.
Subscribe to:
Posts (Atom)


.jpg)


.jpg)
.jpg)
.jpg)
.jpg)
.jpg)
.jpg)
.jpg)


.jpg)
.jpg)
.jpg)
.jpg)