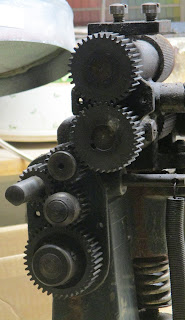
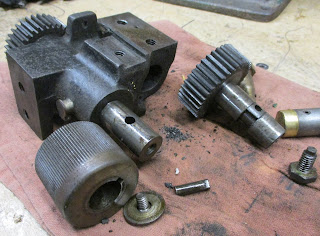
The cutting blade on these things should be handled with much care especially when new!
They are too expensive but work so well when they are sharp.
NOTE:
The blade threads are LH (left hand thread) and so this is the 1st mystery.
The drive wheel thread is RH (right hand thread) the conical wheel on the end of the lower drive wheel MUST come off to get the cutter blade off.
The off center hole in each of the wheels is used to tighten and break the wheels free.
Best use a brass punch at a steep angle in the hole rap it with a hammer.
Rap the lower wheel in the conventionally loosening direction
Rap the blade in the other direction
Worst case you may need to take the crank handle, the gear cover, and the retainer ring off so that the upper shaft can slide out.
It is possible to use a wrench on the blade but you have to protect the shaft in the vise with aluminum jaws
With old well tightened things like the blade you really need the "shock" of the hammer more than the leverage of the wrench.
The new blade is ULTRA sharp, SUPER dangerous, and the Left hand thread just adds to confusion so be careful!
These blades are $100+ each so I will sharpen yours for $50 but there has to be a chance of making a good blade out of it; if it is massively chipped I'll take it off your hands but the repair is too costly.
I love ALL Crafts and have a fantastic shop where I mostly make tools for shoe Making and Shoes Trained as a Draftsman over 40 years ago I spent most of that time in Advanced Vehicle Engineering. With a BFA in Crafts from CCS I have been making art in my studio all that time too. I currently teach Leather working & Shoe Making at CCS in Detroit
Monday, May 27, 2019
American - Landis 5 in 1 Skiver Blade Adjustment & Upgrade
With my latest rebuild I wanted to improve on the fussy not easy to use skiver blade adjuster.
But 1st:
REINSTALLING THE SKIVER BLADE:
The most critical thing (after sharpening) is adjusting the blade to keep it away from the lower drive wheel, the teeth on the drive wheel will damage your newly sharpened blade.
BTW: I am willing to sharpen these blades for $50 if you need this service.
The way to prevent this is to set both the left and right height adjusters as low as they can go.
You really need to work on this from the back of the machine so unbolt it from the table.
I add washers to the hold-down screws so they don't push the blade out of position while tightening.
With both set as low as possible you can move the blade forward until it clears the drive wheel by about a mm or a 1/16th.
THE ADJUSTER UP-GRADE:
The up-grade is making the left side adjuster moveable without using a wrench.
I added the 5/16-18 button head WITH a spring washer, and added a 10-24 lock screw, I added the small lever too, not as easy as the other changes.
I think the left side adjuster is usually set near the lowest point, and most of the adjusting for the work day is done with the right side adjuster (the one with the T handle.)
BUT there are three adjustments: Two for the angle and one is the "depth" guide on the front of the machine.
I use the T handle and the depth together, several pieces of scrap are required.
American - Landis 5 in 1 Rebuild
Got this American branded 5 in 1 for the purpose of restoration
It has come out great so far
The stamped steel logo was a challenge:
The paint was badly chipped; I couldn't stand it.
So I striped the paint, sand-blasted it, primed it, painted the red 1st, the white border 2nd, and then added the AMERICAN as vinyl pieces.
A mix of old and new technology, I used the Cricut cutter to make the vinyl letters. 1st I had to create those letters in CAD. I use Rhino for this, scanned the emblem, brought it in correct to size (there is an easy trick to that) and traced around the letters. A huge amount of work but the results are good.
The most difficult part of the restoration was freeing up the skiver drive wheel piston.
I worked every day for a week, with hammer, pry-bars, Liquid Wrench, channel locks, etc.
Finally I set the mini machinists jack under the ram AND got out the torch, It eventually came out.
REMEMBER, this cast iron it doesn't flex like steel; it just breaks or cracks, this renders the casting to scrap!
You cannot force cast parts like steel, they will break and welding is almost out of the question or at the very least is not cheap.
There had likely been a dripping of water down the back of the machine. That water rusted the lower long shaft too making it difficult to remove.
The machine is made up of basically 4 discrete modules
Took a bunch of reference shots but used my working 5 in 1 to expedite the reassembly.
Did the sand blasting, sanding, and wire wheel work. I needed to wait until it was warm enough to spray paint outside and so finally it is.
The stamped steel logo was a challenge:
The paint was badly chipped; I couldn't stand it.
So I striped the paint, sand-blasted it, primed it, painted the red 1st, the white border 2nd, and then added the AMERICAN as vinyl pieces.
A mix of old and new technology, I used the Cricut cutter to make the vinyl letters. 1st I had to create those letters in CAD. I use Rhino for this, scanned the emblem, brought it in correct to size (there is an easy trick to that) and traced around the letters. A huge amount of work but the results are good.
The most difficult part of the restoration was freeing up the skiver drive wheel piston.
I worked every day for a week, with hammer, pry-bars, Liquid Wrench, channel locks, etc.
Finally I set the mini machinists jack under the ram AND got out the torch, It eventually came out.
REMEMBER, this cast iron it doesn't flex like steel; it just breaks or cracks, this renders the casting to scrap!
You cannot force cast parts like steel, they will break and welding is almost out of the question or at the very least is not cheap.
There had likely been a dripping of water down the back of the machine. That water rusted the lower long shaft too making it difficult to remove.
The machine is made up of basically 4 discrete modules
- The cutter / Base
- The Blade & Drive wheel
- The combination Skive & Welt roller wheel
- The Welt roller
Took a bunch of reference shots but used my working 5 in 1 to expedite the reassembly.
Did the sand blasting, sanding, and wire wheel work. I needed to wait until it was warm enough to spray paint outside and so finally it is.
Subscribe to:
Comments (Atom)


